COMMANDER
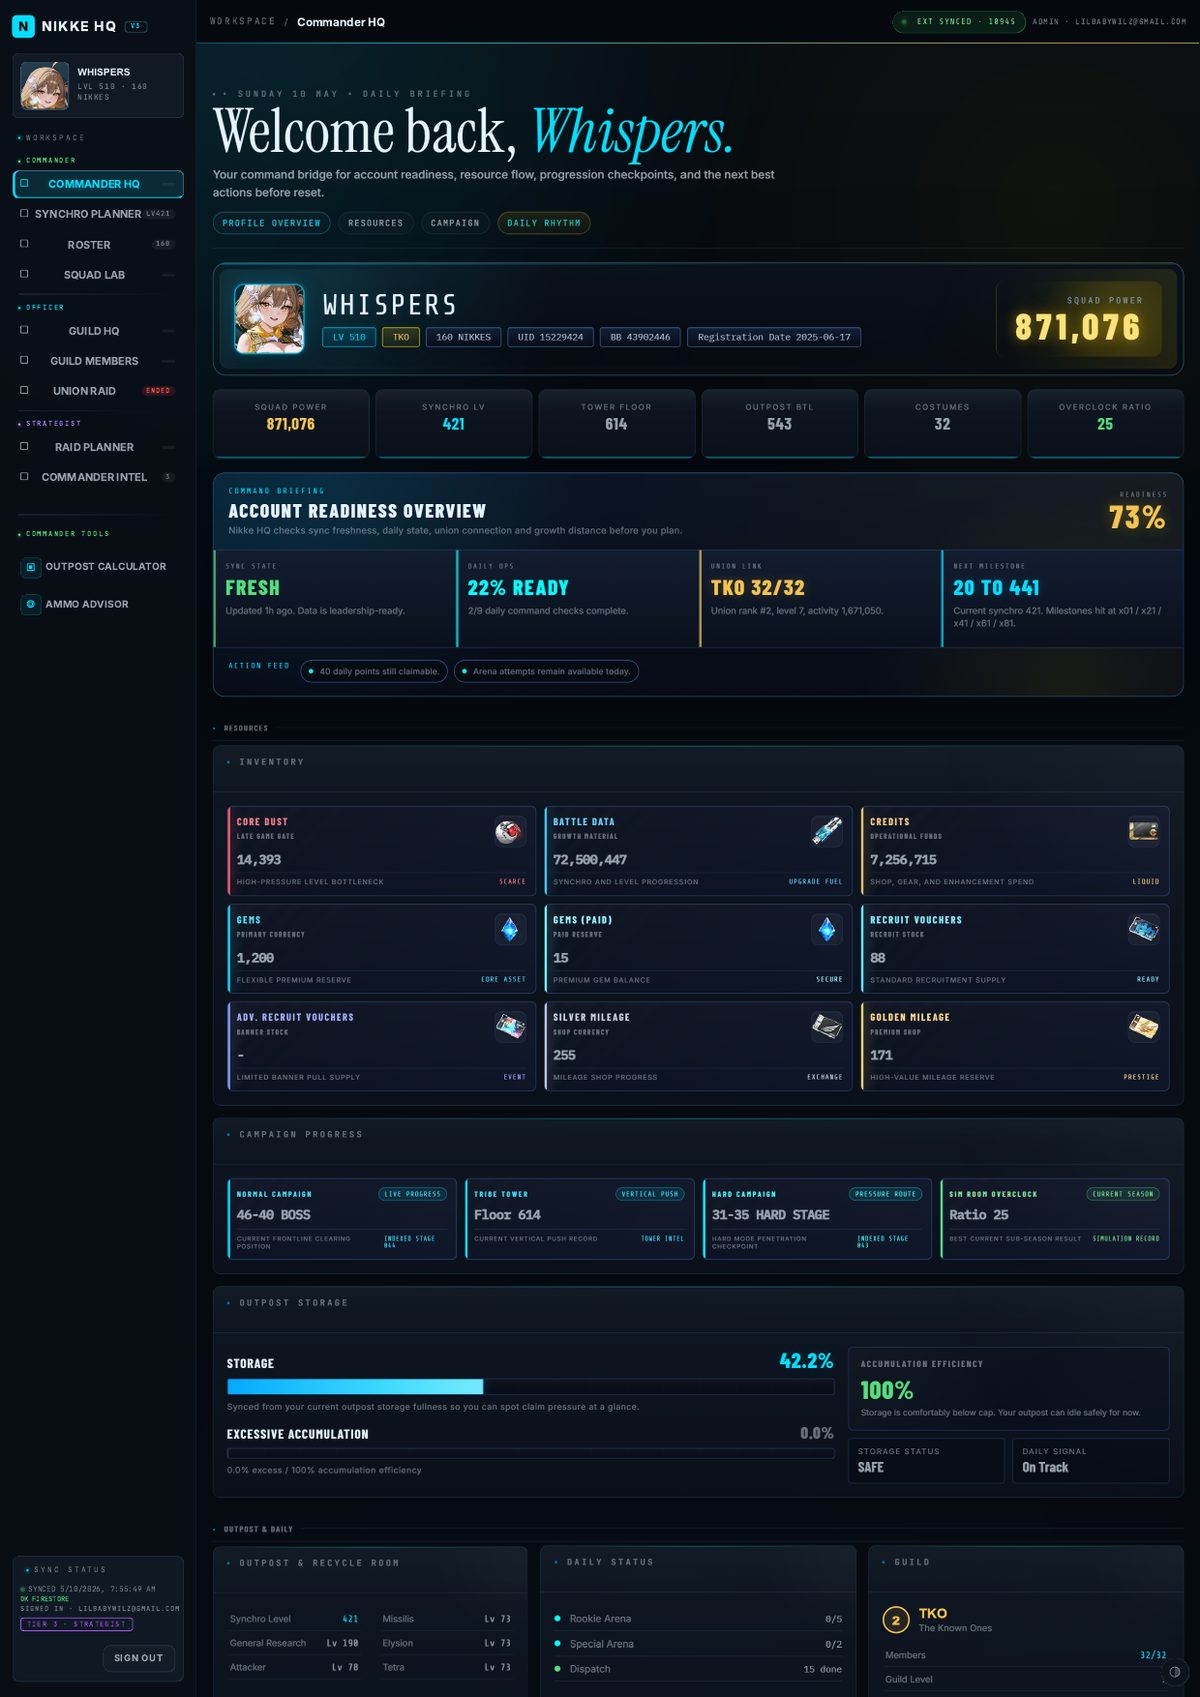
- Commander Level — your current account level, shown in the profile badge.
- Guild — your current union name. Used across raid views to identify your group.
- Nikke Count — total Nikkes owned on the account. Useful for tracking roster growth.
- Profile Team — your active display squad of 5, shown with portraits and element icons.
- Daily Missions — points earned vs. the daily cap. Shows your completion percentage at a glance.
- Arena tickets — remaining Rookie and Special Arena tickets for the day.
- Dispatch & Intercept — active dispatch missions and remaining intercept tickets.
- Sim Room — your current Simulation Room chapter and difficulty.
- Outpost Battle Level — your current outpost defense level. Higher levels unlock better passive rates.
- Infrastructure Core — your core level, which multiplies all passive income rates.
- Synchro Device Level — current synchro level shown here for reference alongside your outpost.
- Recycle Room — research levels for all five resource types shown in a compact table.
- Install the extension — available for Chrome. It reads your account data when you visit blablalink.com.
- Visit blablalink.com while signed into NIKKE to trigger a sync. The extension captures the data automatically.
- Manual refresh — use the ↻ Refresh button at the bottom of the page to re-pull the latest snapshot.
- Auto sync — enable Auto mode to refresh every 5 minutes while the page is open.
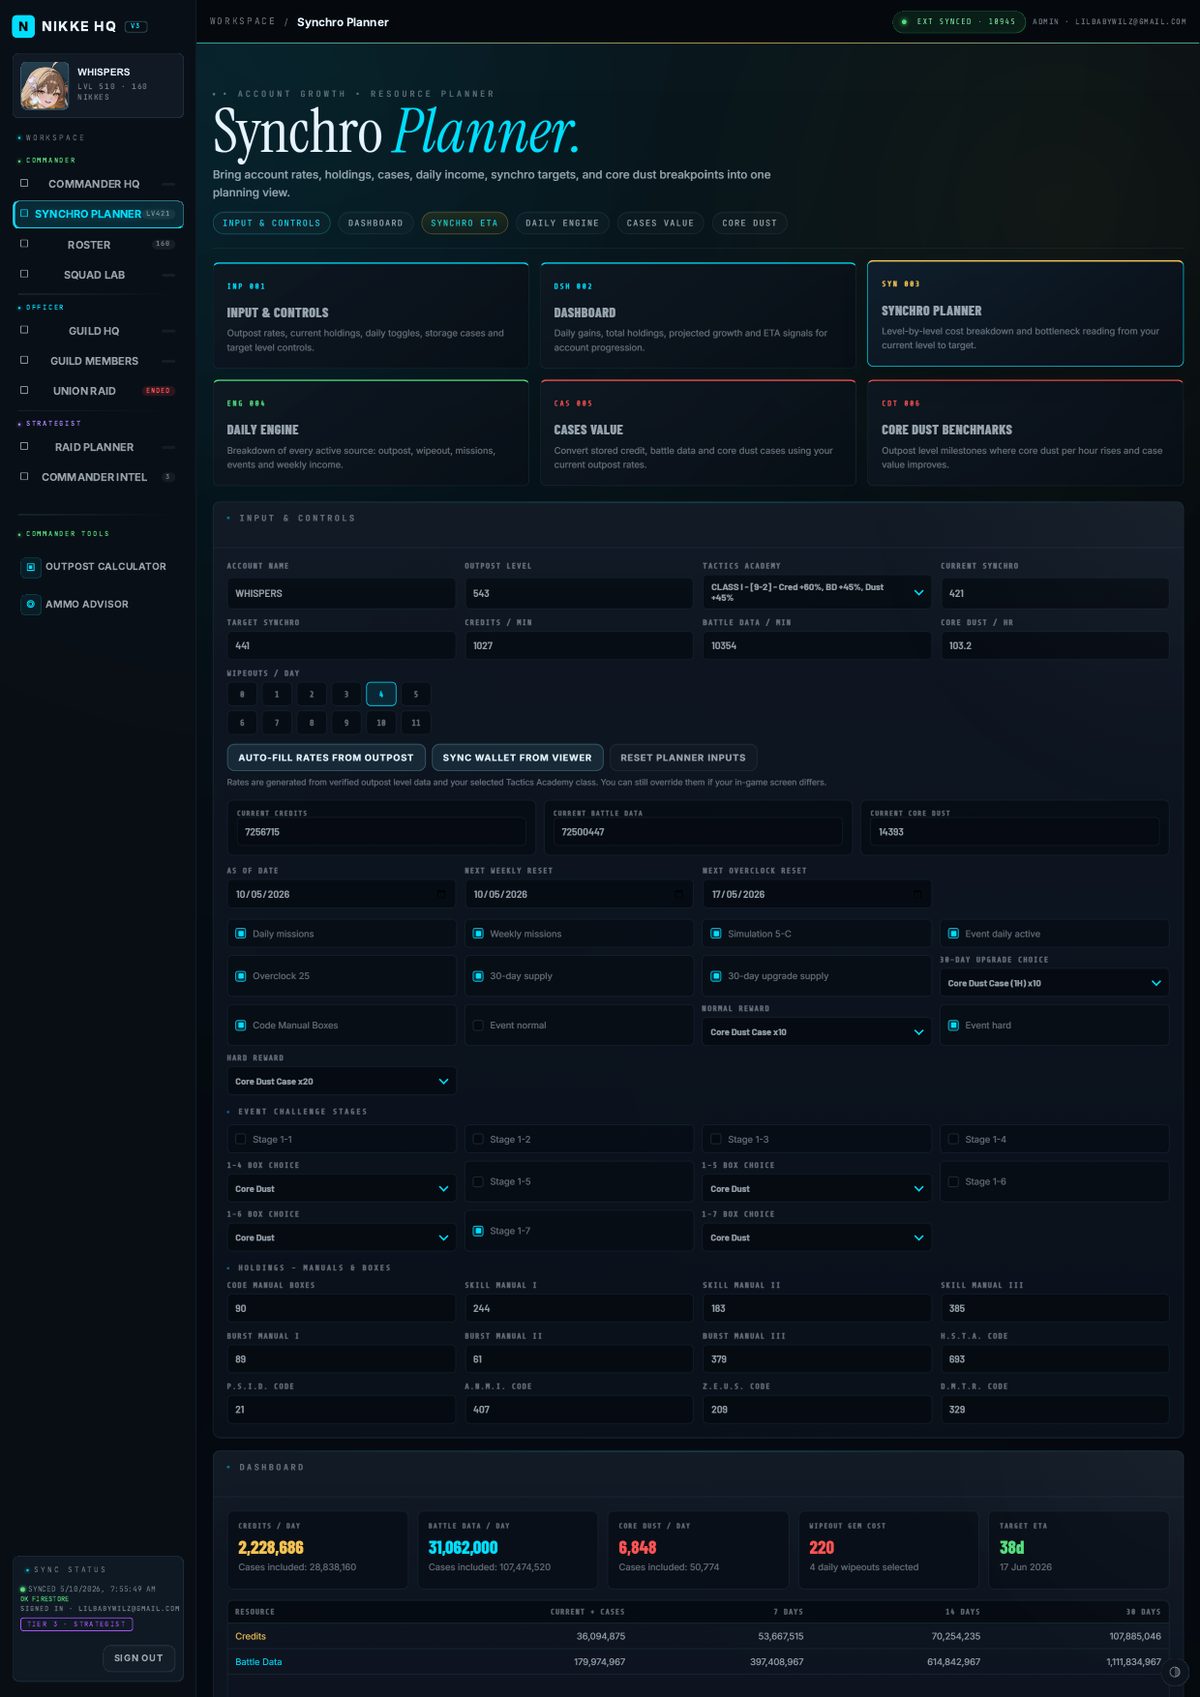
- Synced values include commander name, current synchro level, outpost battle level, credits, battle data and core dust.
- Generated rates are Credits/min, Battle Data/min and Core Dust/hr. These drive daily income, case value and ETA calculations.
- Wipeouts add two hours of outpost resources per run and subtract the correct daily gem cost.
- Toggles let you include daily missions, Simulation Room, event farming, weekly missions and monthly supply income.
- Daily gains combine passive outpost income, wipeouts, daily sources and enabled event sources.
- Total holdings means current wallet plus stored case value.
- Projection rows show where each resource should be after 7, 14 and 30 days at your current settings.
- Target ETA estimates when your selected synchro target becomes affordable.
- Days Until shows the estimated time before each level is affordable from today.
- Bottleneck is the resource that takes the longest to recover for that level or target.
- Ready rows mean your current resources and stored cases already cover that step.
- Target level should be adjusted to the next realistic push, not always your dream endpoint.
- Outpost Passive is your base resource engine over 24 hours.
- Wipeout scales directly from your selected wipeout count and outpost rates.
- Events estimate the reward choice you selected for normal and hard event farming.
- Weekly Missions are averaged per day so the forecast stays readable.
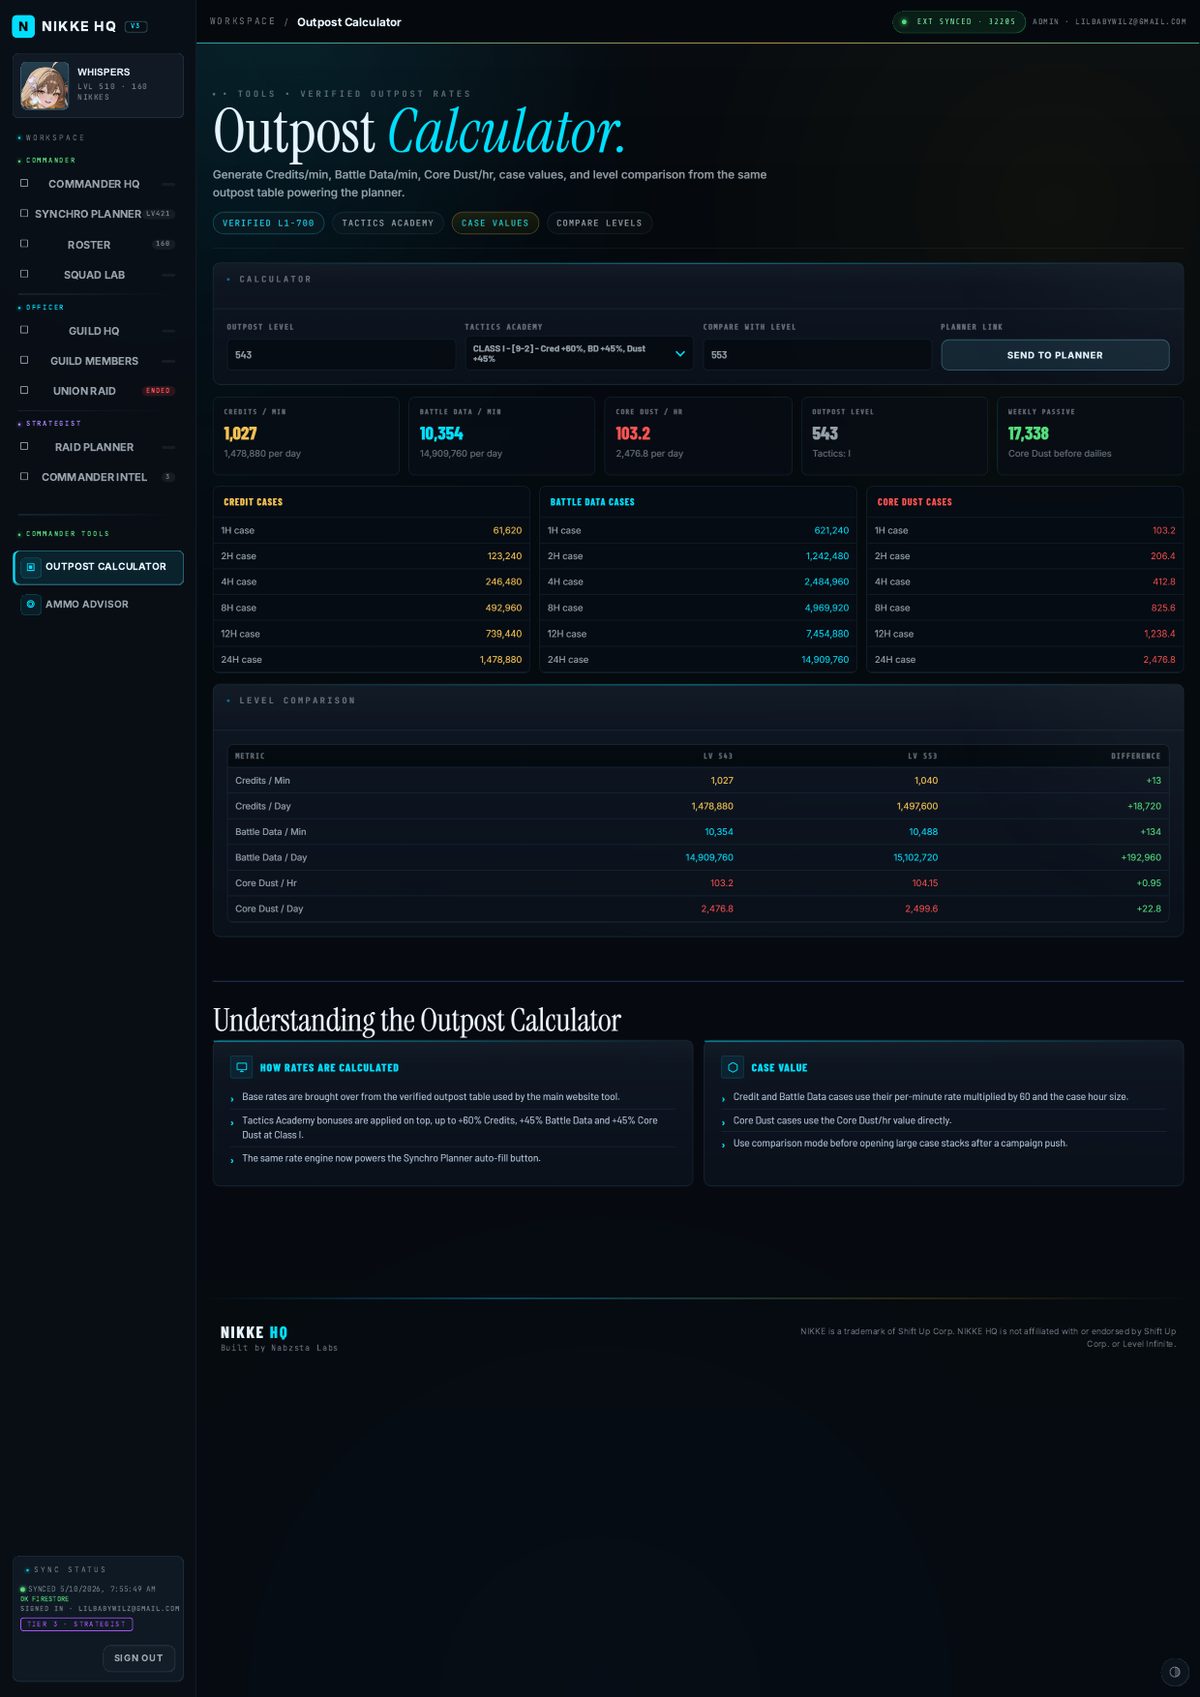
- Credit cases use Credits/min multiplied by 60 and the case hour size.
- Battle Data cases use Battle Data/min multiplied by 60 and the case hour size.
- Core Dust cases use Core Dust/hr directly.
- Total stored value is added to your wallet before synchro affordability is calculated.
- Current bracket shows the dust/hr range your outpost level is currently sitting in.
- Next benchmark shows how many outpost levels remain before your dust case value improves.
- Case timing warns when you are close enough to a breakpoint that holding cases may be smarter.
- Late breakpoints matter more because dust becomes the long-term synchro bottleneck.
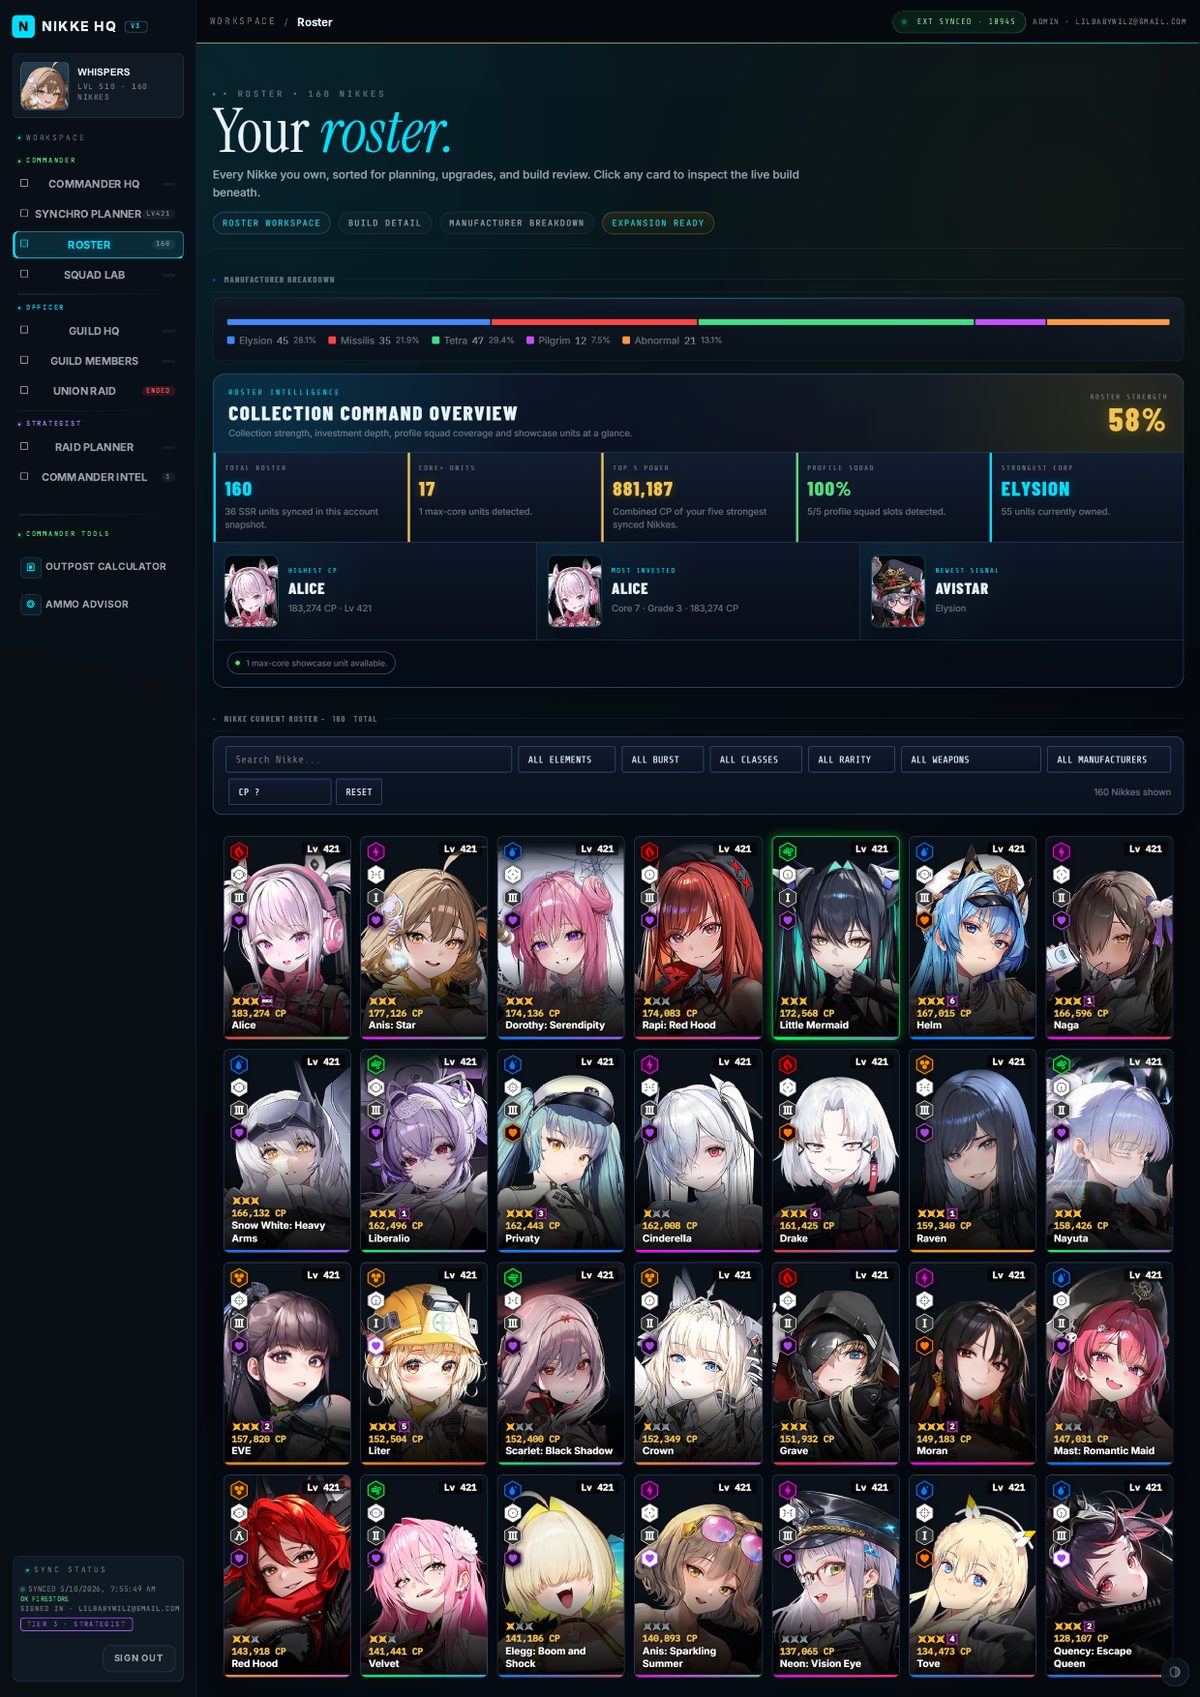
- Element — filter by Fire, Water, Wind, Electric or Iron to find your best element-specific teams.
- Burst — filter by B1, B2 or B3 to build balanced burst chains quickly.
- Class — Attacker, Defender or Supporter — useful for identifying roster gaps.
- Weapon — AR, MG, RL, SG, SMG, SR — filter for specific weapon-type content.
- Sort by CP or Level — identify your strongest Nikkes or find under-levelled ones at a glance.
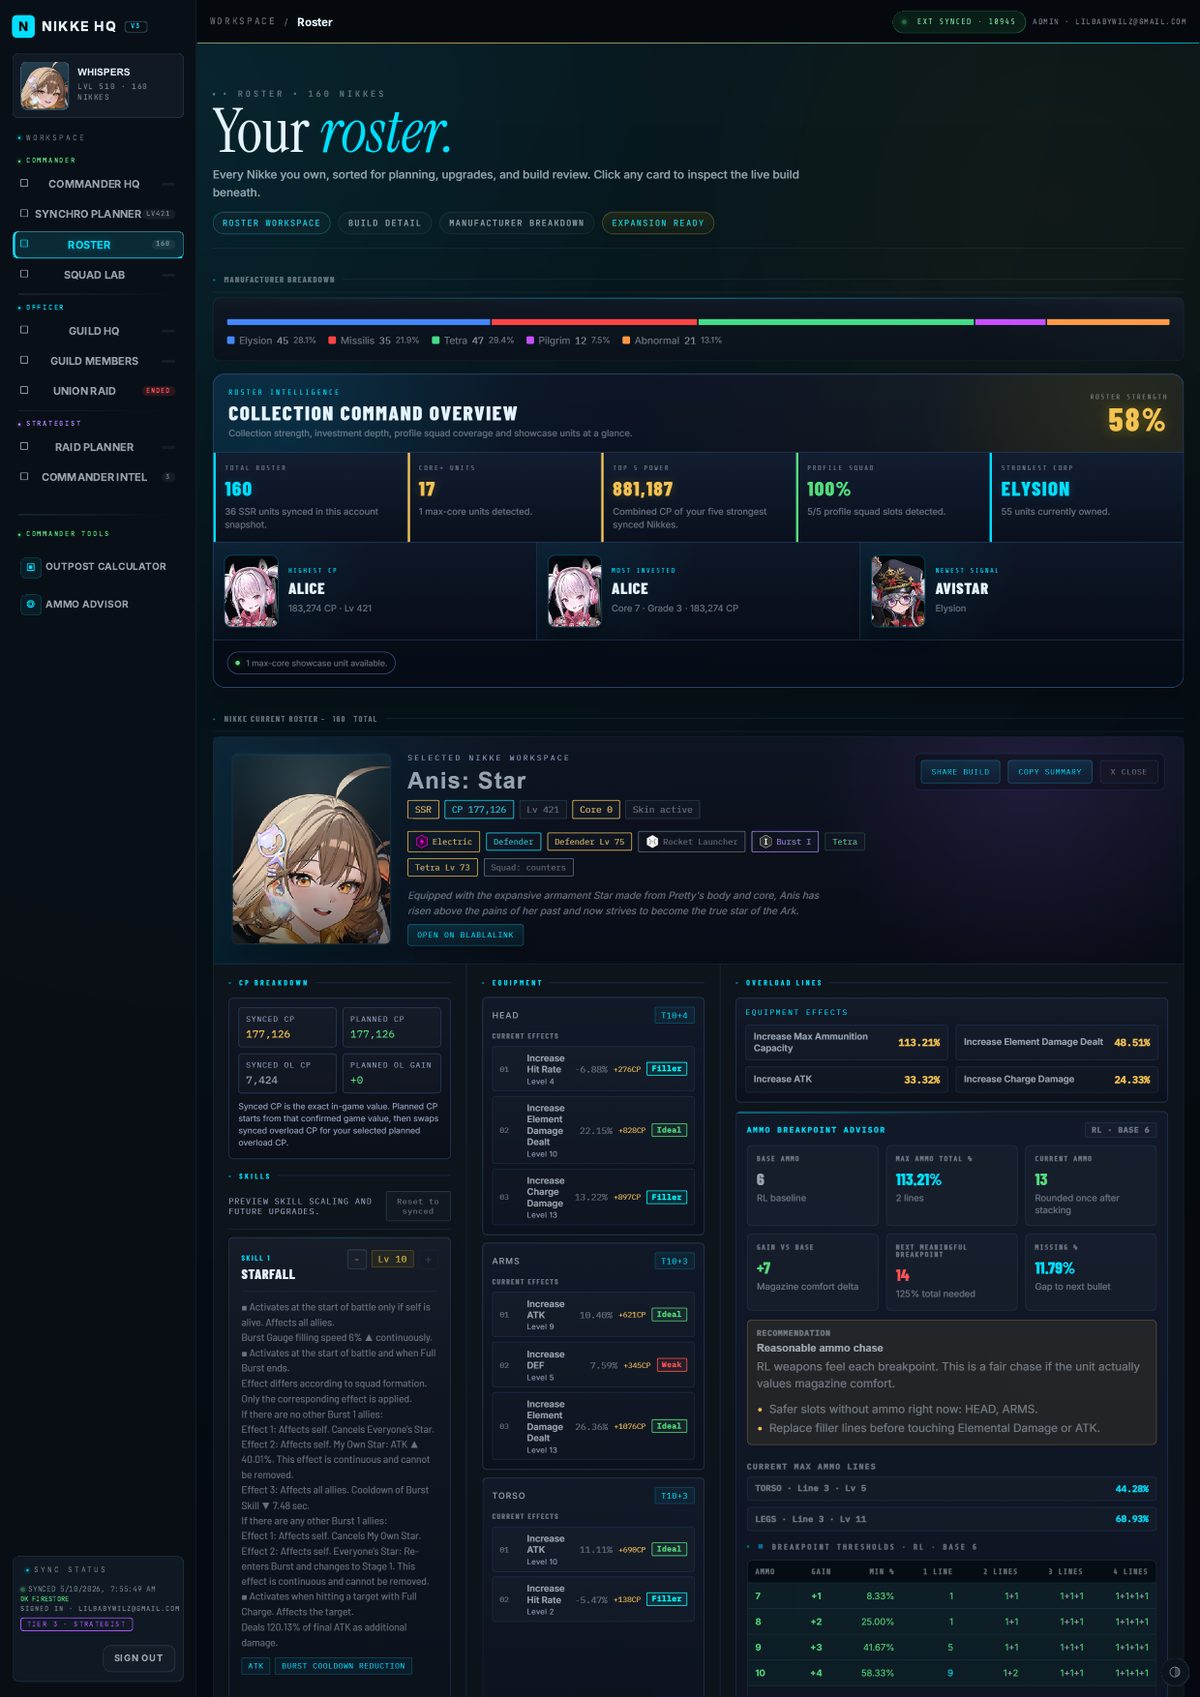
- Stars + cores — gold and blank stars show limit break progress up to MLB. After MLB, the purple core badge shows Core 1-6 or max.
- Core badge — appears after MLB when the Nikke has extra duplicate core upgrades.
- CP — Combat Power. Higher CP Nikkes contribute more to your team's stat ceiling.
- Lv — current level. Nikkes capped at your Synchro level won't show further growth until you level up.
- Grade bar — the coloured top stripe: gold = MLB/maxed bond, purple = 2-bond, blue = 1-bond, grey = base.
- Find under-levelled carries — filter by your main element + Attacker, sort by CP. Any Nikke far below your max is worth levelling.
- Core priority — MLB Nikkes with no purple core badge are your next upgrade targets — cores give large stat jumps.
- Company stripe — the thin coloured bar on the left side of each card shows which company they belong to (Elysion, Missilis, Tetra, Pilgrim, Abnormal).
- Total Nikkes — your full roster size, updated on each sync.
- MLB count — how many Nikkes have reached max bond level.
- Average CP — useful for tracking account-wide power growth over time.
- Synchro Level — shown here as context for interpreting Nikke levels in your roster.
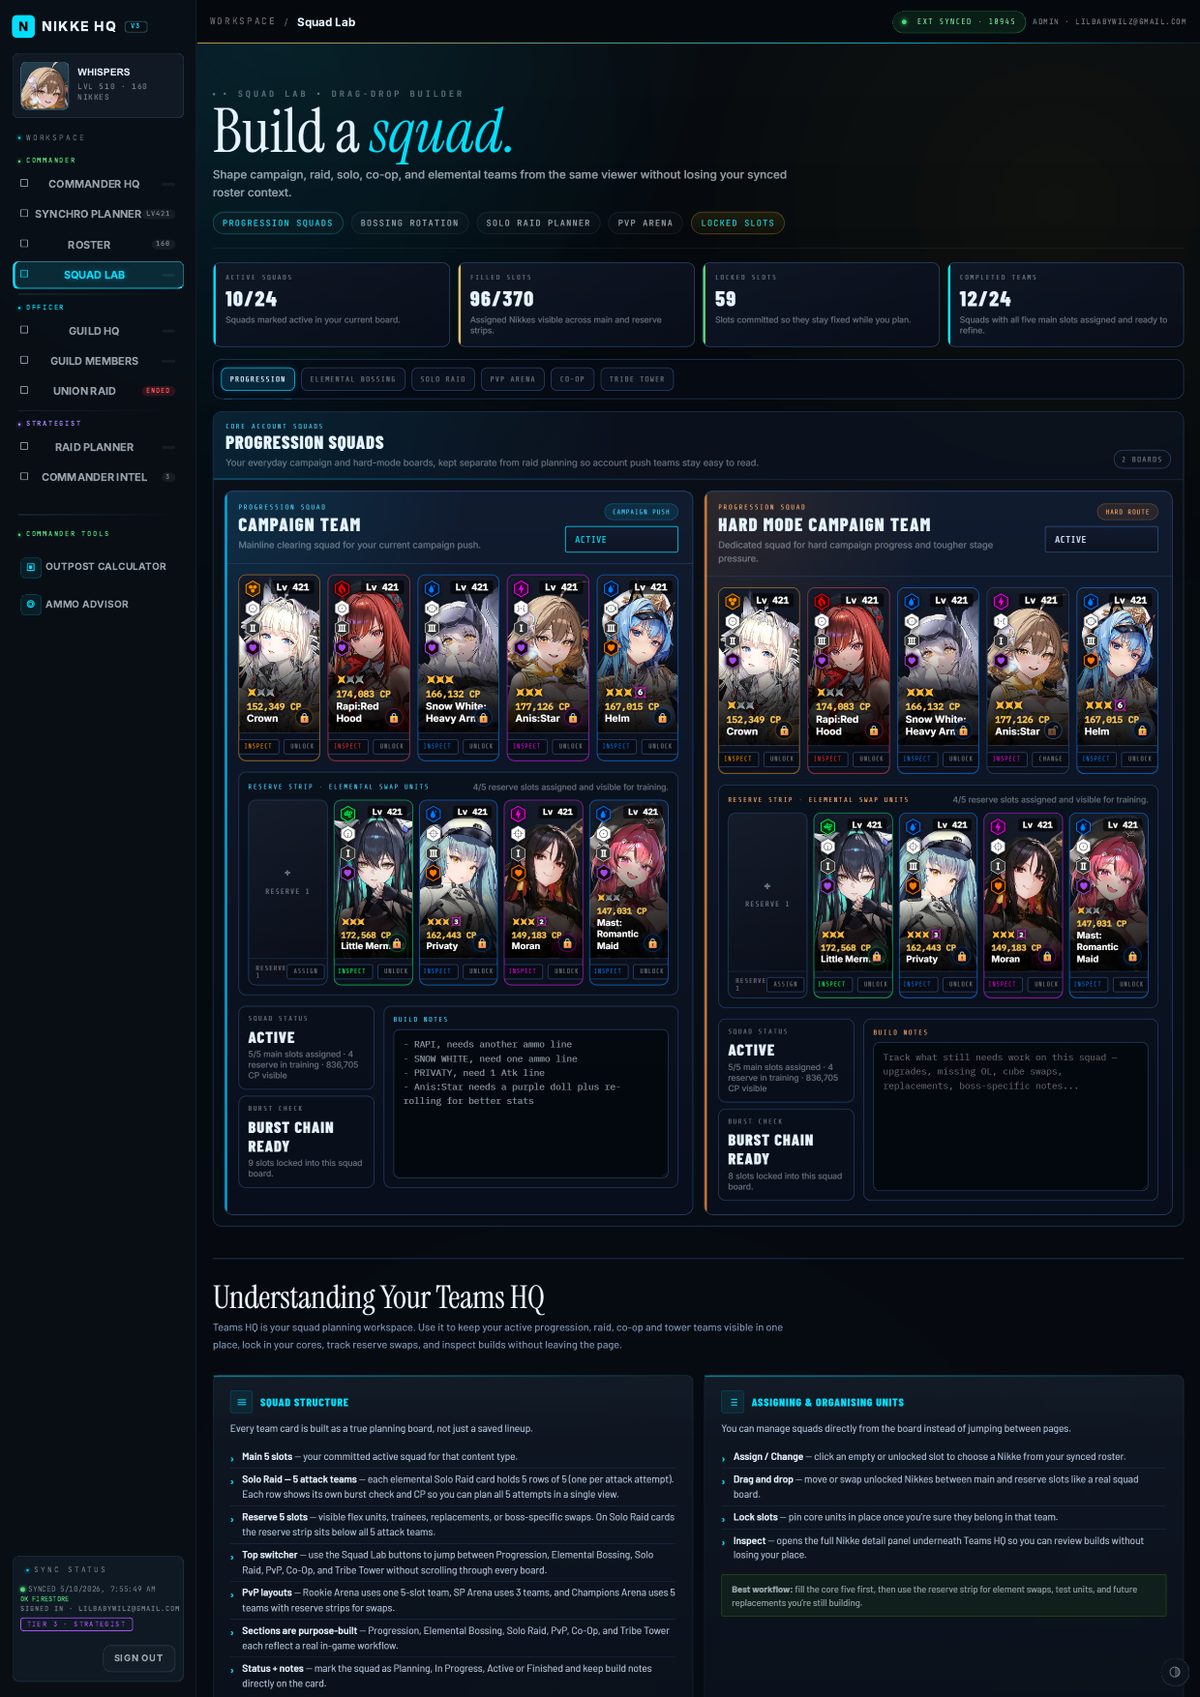
- Main 5 slots — your committed active squad for that content type.
- Solo Raid — 5 attack teams — each elemental Solo Raid card holds 5 rows of 5 (one per attack attempt). Each row shows its own burst check and CP so you can plan all 5 attempts in a single view.
- Reserve 5 slots — visible flex units, trainees, replacements, or boss-specific swaps. On Solo Raid cards the reserve strip sits below all 5 attack teams.
- Top switcher — use the Squad Lab buttons to jump between Progression, Elemental Bossing, Solo Raid, PvP, Co-Op, and Tribe Tower without scrolling through every board.
- PvP layouts — Rookie Arena uses one 5-slot team, SP Arena uses 3 teams, and Champions Arena uses 5 teams with reserve strips for swaps.
- Sections are purpose-built — Progression, Elemental Bossing, Solo Raid, PvP, Co-Op, and Tribe Tower each reflect a real in-game workflow.
- Status + notes — mark the squad as Planning, In Progress, Active or Finished and keep build notes directly on the card.
- Assign / Change — click an empty or unlocked slot to choose a Nikke from your synced roster.
- Drag and drop — move or swap unlocked Nikkes between main and reserve slots like a real squad board.
- Lock slots — pin core units in place once you’re sure they belong in that team.
- Inspect — opens the full Nikke detail panel underneath Teams HQ so you can review builds without losing your place.
- Element glow — each unit glows in its real element colour, making off-element picks instantly obvious.
- Left-side icon stack — element, weapon and burst are shown directly on the portrait for fast role checking.
- Stars + MLB/Core — the portrait overlay shows your bond/core progression at a glance.
- CP + level — visible immediately, so you can see whether a squad is underbuilt before opening the detail panel.
- Progression Squads — track your Campaign and Hard Mode cores plus the units you’re preparing to slot in next.
- Elemental Bossing Squads — keep your Union Raid element teams visible in Shooting Range order: Water, Fire, Wind, Iron, Electric.
- Solo Raid — plan all 5 attack attempts per element inside a single card. Each row is one attempt with its own burst check, so you can see coverage gaps before the raid starts. The reserve strip holds your swap candidates still in training.
- Co-Op — build around your fixed shell teams, then use reserves for boss-specific or mode-specific swaps.
- Tribe Tower — maintain your main tower core and each manufacturer tower without needing separate notes outside the tool.
- Name, level and UID — the public identifiers other players see first.
- Member count and activity — shows whether the guild is full, growing, or drifting.
- Rank and percentile — useful context when positioning the guild competitively.
- Supporter strip — surfaces the visible member-card identities tied to the guild header.
- Average level — indicates the typical maturity of the roster.
- Total synchro — useful for quickly comparing unions at a glance.
- Bla ranking — if available, shows where the union lands on the wider BlaBla ladder.
- Distribution chart — exposes whether strength is concentrated at the top or more evenly distributed.
- Post title and copy — reveals how the guild is pitching itself to recruits.
- Requirements — should align with the union info panel so expectations are consistent.
- Engagement numbers — likes and comments can help indicate visibility and interest.
- Tag metadata — useful if you later want to separate recruitment content from other guild posts.
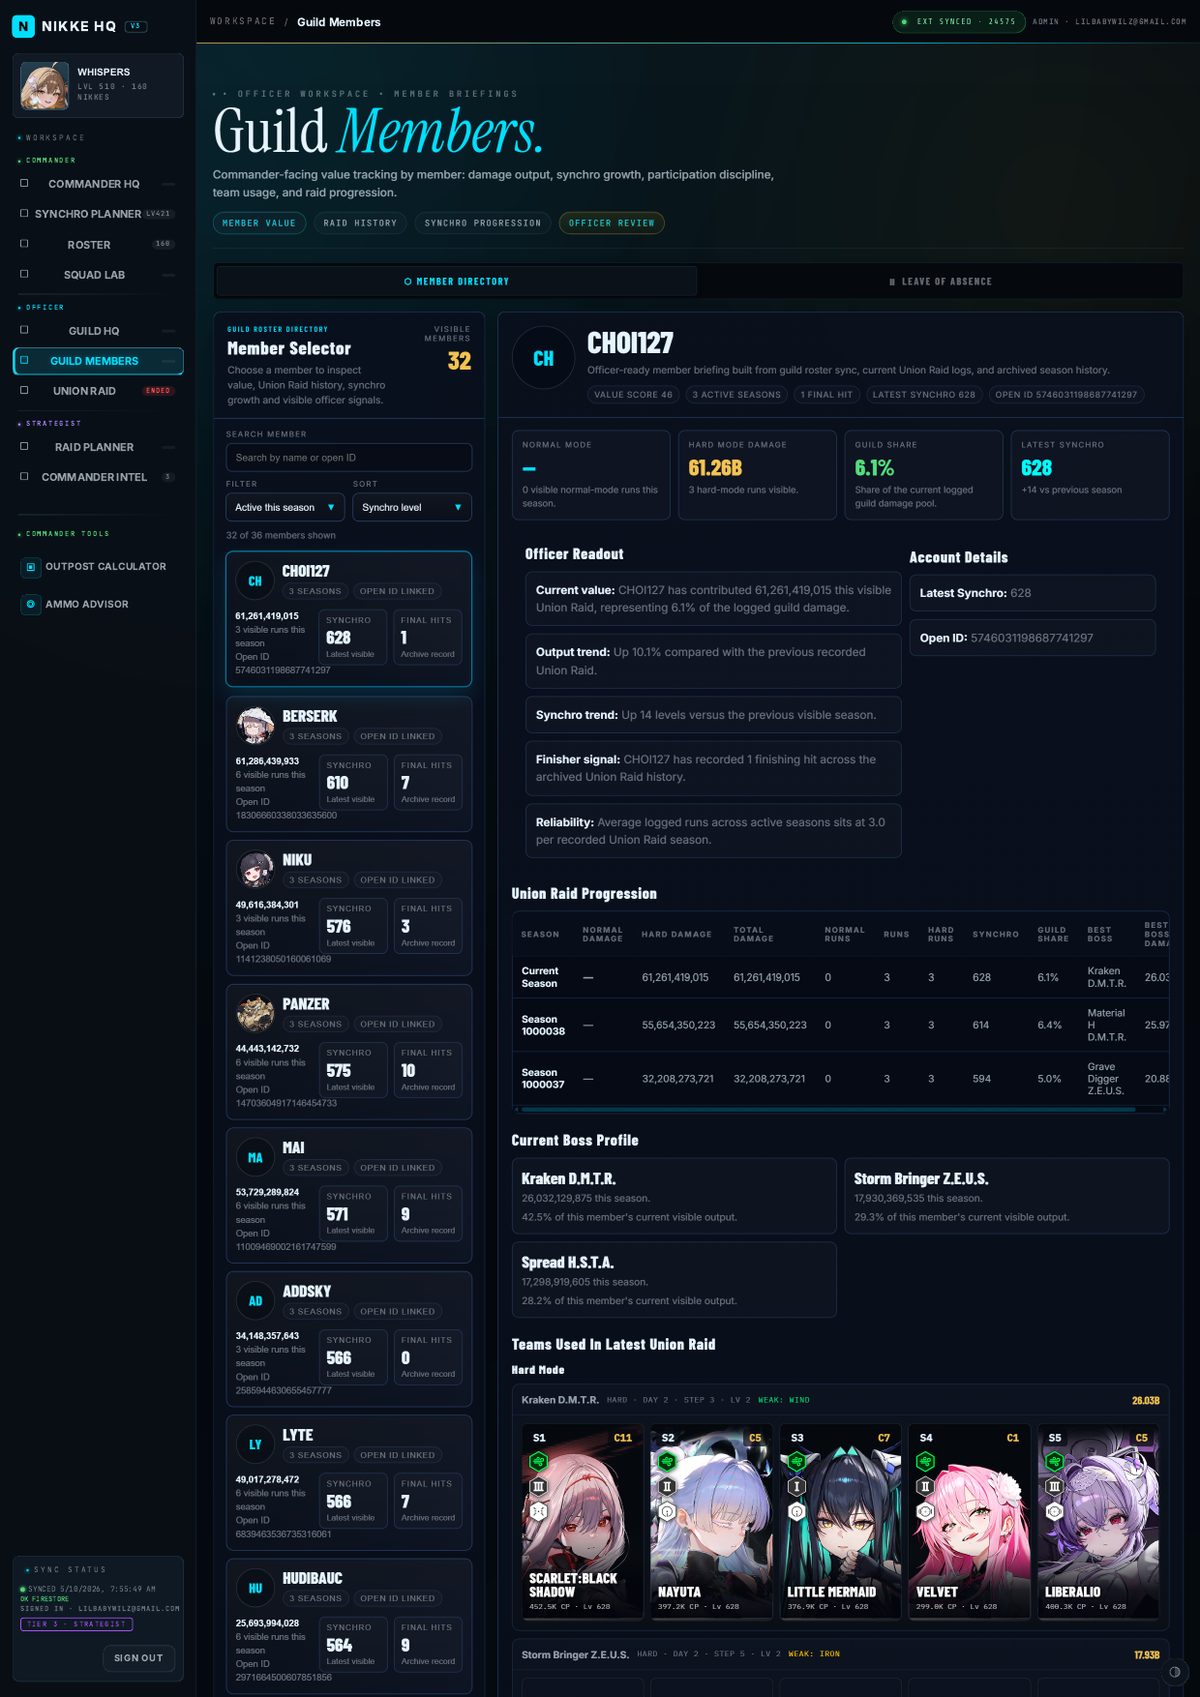
- Click any portrait — jump straight into that member's officer briefing.
- Current season cards — surface live output, visible synchro and season presence in one glance.
- Supports non-raiders too — members with no logged hits still appear when they exist in the synced guild roster.
- Damage trend — compare current and previous Union Raid output quickly.
- Synchro trend — see whether roster maturity is actually moving.
- Participation discipline — track logged runs and hard-mode presence over time.
- Value score — combines visible output, presence, and progression into a quick signal.
- Boss profile — helps identify specialists, finishers and damage concentration.
- Review notes — the page highlights momentum, consistency and possible concern areas automatically.
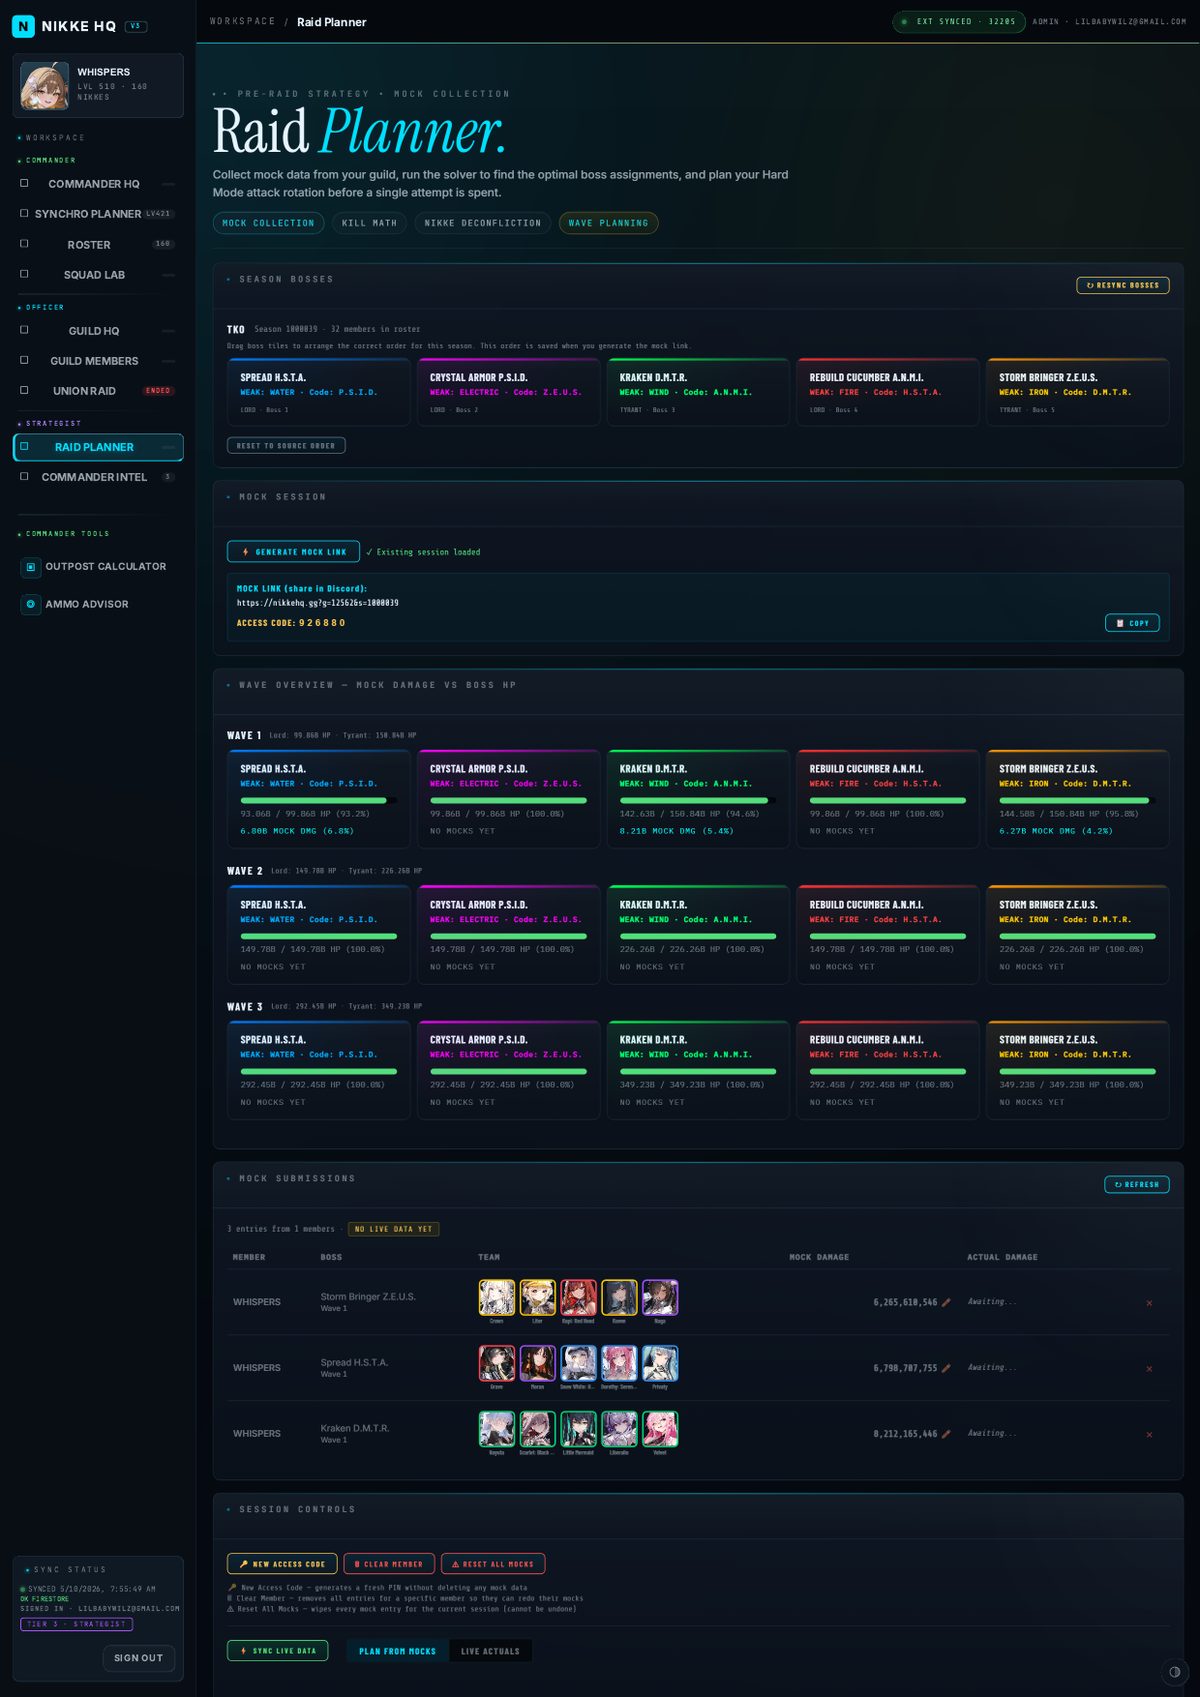
- Step 1 — Normal Mode goes live. Sync your account with the extension. This captures the season's boss names, elements and positions automatically. The Raid Planner reads this data to populate the 5 bosses.
- Step 2 — Normal Mode ends, Hard Mode mock window opens. Open the Raid Planner and click ⚡ GENERATE MOCK LINK. This creates a unique URL with a 6-digit access code. Copy the link and the code.
- Step 3 — Share in Discord. Post the mock link and access code in your guild Discord channel. Tell members to click the link, enter the code, pick their name, and submit their mock damage.
- Step 4 — Members submit mocks. Each member opens the link on nikkehq.gg, enters the PIN, selects their name from the roster, picks the boss, builds their team of 5 Nikkes, and enters their damage number. They can queue multiple mocks before submitting.
- Step 5 — Review submissions. Back in the Raid Planner, click ↻ REFRESH to see all mock entries from your guild. Every submission shows the member, boss, team portraits and exact damage.
- Step 6 — Run the solver. Click ⚡ RUN SOLVER. The solver calculates the optimal attack plan — who attacks which boss with which team — to clear Wave 1 with minimum attempts spent.
- Step 7 — Apply overrides and re-solve. Pin members who won't be available, lock specialists to their boss, then re-run the solver. It recalculates around your constraints.
- Step 8 — Share the plan. Post the final attack plan in Discord before raid day so everyone knows their assignment.
- Live raid data first — if a season is currently active, the planner uses those bosses. This is the ideal scenario since members will be mocking against the current bosses.
- Archived seasons fallback — if no live raid is running (between seasons), the planner pulls boss data from your most recently archived season.
- HP values built in — Lord and Tyrant HP for all 3 waves is hardcoded from the game data. Boss 1, 2 and 4 are always Lord class. Boss 3 and 5 are always Tyrant class.
- Elements from sync — weak elements are captured during your Normal Mode extension sync, so members see which element to build teams against.
- Three wave sections — Wave 1, Wave 2 and Wave 3 each display 5 boss tiles with their HP values for that wave. Lord HP and Tyrant HP increase with each wave.
- HP bars fill down — as members submit mocks against a boss, the bar shrinks showing how much HP remains. Green bar = lots of HP left, red = nearly dead.
- Mock damage total — each tile shows the total mock damage submitted against that boss and the percentage of HP it covers.
- ✓ PROJECTED CLEAR — appears in green when total mock damage exceeds boss HP. This means you have enough firepower in your guild to kill that boss.
- Overkill warning — shows in gold when mock damage significantly exceeds HP. A small overkill is fine, but billions of waste means those attempts could be redirected to a harder boss.
- ✓ ALL BOSSES PROJECTED CLEAR — appears next to the wave header when all 5 bosses in that wave have enough mock damage to die. This is your green light.
- Updates on refresh — hit ↻ REFRESH on Mock Submissions and the wave tiles recalculate automatically with the latest data.
- What it does — re-reads boss names, elements and positions from your latest synced data (live or archived) and pushes them to the Firestore session. No mock entries are deleted.
- When to use it — after syncing with the extension during a new season, or if you created the mock link before the boss data was available.
- Also updates roster — the guild roster in the session gets refreshed too, so any new members will appear in the mock entry dropdown.
- Mock entry page updates instantly — members who open the link after a resync will see the correct boss names and elements.
- Generate Mock Link — creates a unique URL tied to your guild and season. Share it in Discord.
- 6-digit PIN — protects your mock data from outsiders. Only members with the code can enter. Change it any time by regenerating.
- Roster included — members pick their name from the guild roster dropdown, no typing required. The roster is pulled from your synced guild member data.
- One link per season — if you regenerate the link for the same season, it updates the existing session (keeping all previous submissions). Different seasons get different sessions.
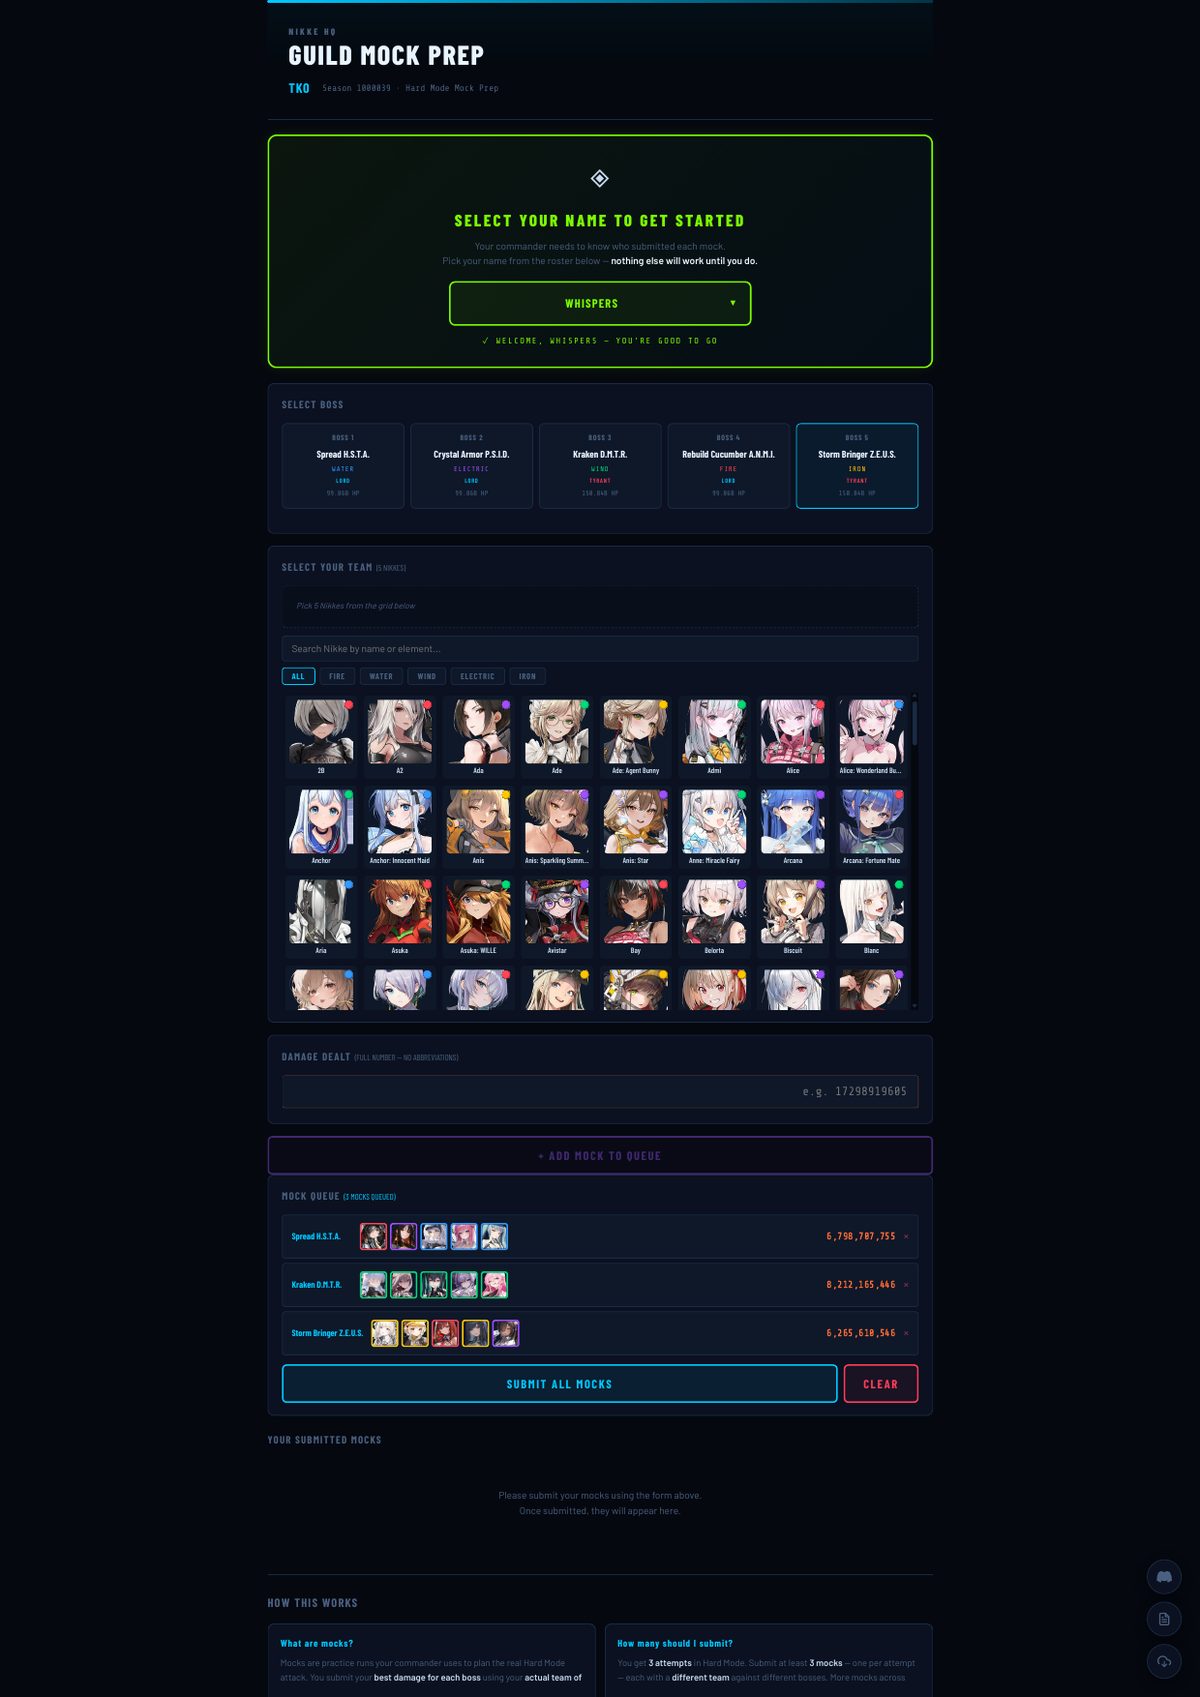
- Click the link — opens a clean mock entry page on nikkehq.gg. No login, no navigation, no other features visible.
- Enter the PIN — 6-digit code the commander shared in Discord.
- Pick their name — dropdown list of all guild members. No typing.
- Select boss — 5 boss cards showing name, element, class (Lord/Tyrant) and HP. Wave tabs to switch between Wave 1, 2 and 3 mock data.
- Build team — searchable grid of all 189 Nikkes with portraits, element dots and names. Click 5 to build a team. Selected Nikkes appear in a strip above the grid. Click × to remove.
- Enter damage — full number, no abbreviations. The form formats it with commas and shows the short version (e.g. 17.30B) for reference.
- Queue system — members click + ADD MOCK TO QUEUE to stage their entry locally. They can add multiple mocks, review the queue, remove mistakes, then hit SUBMIT ALL MOCKS to send everything to Firebase in one batch. No accidental submissions.
- Delete after submit — submitted mocks appear at the bottom with a × delete button if they need to redo one.
- Multiple entries per member — members can submit as many mocks as they want against different bosses with different teams. The solver uses all of them to find the best combinations.
- Full numbers — damage is stored as exact integers for precise kill math calculations. No rounding, no approximation.
- Team portraits — each entry shows the 5 Nikkes used with element-coloured borders and names underneath.
- ↻ REFRESH — hit this to pull the latest submissions. Members can be submitting while you're reviewing — just refresh to see new entries.
- Nikke deconfliction — a member can't use the same Nikke in two teams. If a member mocked Boss 1 with Crown and Boss 3 with Crown, the solver picks the combination that gives the best total damage without reusing any Nikke.
- Minimum attempts on Wave 1 — 32 members × 3 attempts = 96 total for the entire Hard Mode. The solver uses the fewest attempts possible on Wave 1 so the rest carry forward to Wave 2 and Wave 3.
- Overkill control — the solver minimises wasted damage. A few million over boss HP is fine. Billions of overkill means those attempts could have been saved or redirected to a harder boss.
- Wave carry-forward — members held back from Wave 1 keep all 3 attempts for Wave 2. Members who used 1 or 2 attempts carry the remainder. Same mock data works because member damage is consistent across waves.
- Kill math per boss — for each boss, the solver shows: total assigned damage, boss HP, surplus or shortfall, and a clear PROJECTED CLEAR or SHORTFALL signal.
- Pin to Wave 1 — force a member into Wave 1. Use this for members who won't be online when Wave 2 opens.
- Pin to Wave 2 — hold back your heaviest hitters regardless of what the solver suggests. Their 3 attempts are preserved for harder bosses.
- Lock to boss — assign a member to a specific boss. The solver assigns everyone else around that constraint.
- Re-solve — after any override, re-run the solver. It recalculates the optimal plan around your pinned and locked members.
- 🔑 New Access Code — generates a fresh 6-digit PIN without deleting any mock data. Use this if the code leaked, or to lock out further submissions after everyone has submitted.
- 🗑 Clear Member — removes all entries for a specific member so they can redo their mocks. Type the member's name and confirm. Useful when someone submitted wrong teams or damage numbers.
- ⚠ Reset All Mocks — wipes every mock entry in the session. Double confirmation required — this cannot be undone. Use this if you want everyone to re-mock from scratch within the same season.
- Per-entry delete — every row in the Mock Submissions table has a × button to remove individual entries. Use this for surgical fixes rather than clearing an entire member.
- Session owner — whoever clicks ⚡ GENERATE MOCK LINK first becomes the session owner. Their Firebase account (Google email) is permanently attached to that session. The owner has full control over everything and is the only person who can add or remove officers.
- Officers — the owner can add sub-leaders or trusted members as officers via the OFFICER ACCESS panel. Type their Google email (the one they log into the tool with) and they get the same planner controls as the owner — delete entries, clear members, reset session, run solver, resync bosses. The only thing they can't do is manage other officers.
- Regular members — any guild member who owns the tool but isn't the owner or an officer sees a read-only view. They can see the wave tiles, mock submissions, solver output and the full attack plan — but all control buttons are hidden. A gold banner tells them they're in read-only mode. This is intentional — members can check the plan and see their own submission without the commander needing to screenshot it for them.
- Mock entry page — the nikkehq.gg mock entry form is separate from planner access. Any guild member with the link and PIN can submit mocks regardless of their planner role. Submitting mocks doesn't require owning the tool.
- Adding an officer — open the OFFICER ACCESS panel → click + ADD OFFICER → enter their Google email → confirm. They'll have full access next time they open the Raid Planner.
- Removing an officer — click × next to their email in the officer list. They'll drop to read-only instantly. Only the session owner can remove officers.
- No game role dependency — access control is managed entirely within NIKKE HQ, not from in-game guild roles. This means you choose who has planner control regardless of their in-game rank.
- KPI cards — four numbers at a glance: submitted (3+ mocks), partial (1–2 mocks), not yet (0), and total roster size.
- Not yet list (red) — members who haven't submitted a single mock. These need the first reminder.
- Partial list (gold) — members who submitted 1 or 2 mocks but need 3. Each member gets 3 attempts in Hard Mode, so the solver needs all 3 teams to plan accurately. Shows count as (1/3) or (2/3).
- Submitted list (cyan) — members with 3 or more mocks. These are ready for the solver.
- Auto-updates on refresh — hit ↻ REFRESH on Mock Submissions and the status panel updates automatically.
- Before the planner — commander guesses who's strong, holds random members back, some bosses get overkilled by 30B while another is 5B short of dying. 15 attempts wasted. Guild reaches Wave 2 with 50 attempts left instead of 65.
- With the planner — commander knows exactly who can deal what to each boss. Assigns the minimum needed for Wave 1, saves the rest. Every boss dies with minimal waste. Guild enters Wave 2 with maximum attempts and their strongest members fully loaded.
- The difference — that extra 15 attempts on Wave 2 is the difference between clearing it and falling short. Over a season, that's the gap between top guilds and everyone else.
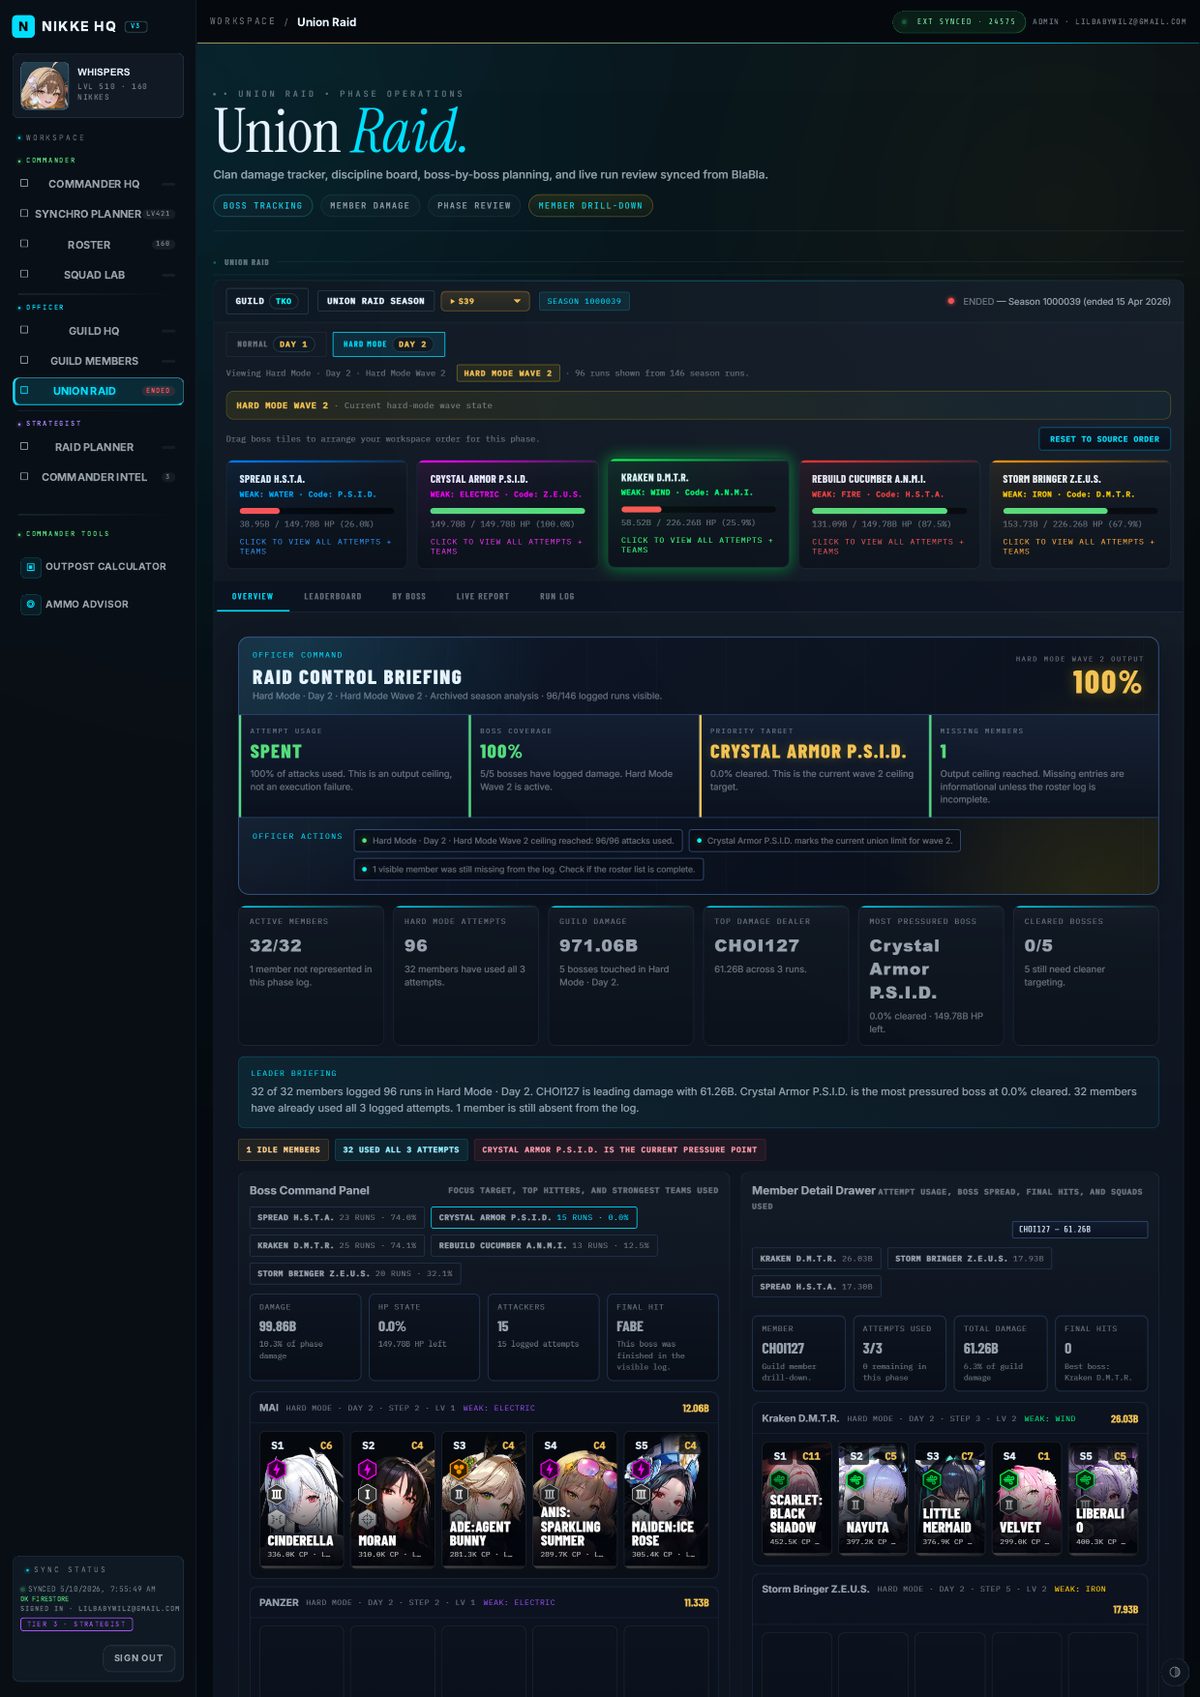
- HP bar colour — green = healthy boss (lots of HP left), transitioning through orange and red as the boss gets closer to being cleared.
- WEAK element — the element you should attack with for bonus damage. Shown in the boss tile in its element colour.
- Code name — each boss has a codename (Z.E.U.S., P.S.I.D., etc.) displayed in the tile for quick identification.
- HP remaining — exact HP left in billions or trillions, plus a percentage. Use this to judge whether your remaining attempts can clear the boss.
- Raid Readiness score — a percentage summarising how many attempts have been logged versus how many are expected. Below 80% mid-day means your guild needs a nudge.
- KPI cards — total guild damage, top contributor, boss clear count and attempt usage at a glance.
- Boss Command Panel — click any boss chip to see who attacked it, their squads and damage. Use this to spot boss-specific weak points.
- Member Attempt Status — a filterable table of every member's attempts, damage and boss focus. Filter by status (All 3 Used / Partial / No Attacks) to quickly find who still needs to go.
- Participation Control — summary pills showing complete, partial, missing and idle member counts. Below that, the inactive members list shows guild members with zero logged runs.
- Attack Story — a timeline of the most important runs in sequence, so you can see how the raid unfolded.
- Boss selector — click any boss name to filter to just that target. See every run logged against it, sorted by damage.
- Squad portraits — each run shows the 5 Nikkes used with element, burst type and weapon icons. Hover for CP and level.
- Damage comparison — see who dealt the most to this specific boss. Members with high damage here are your boss specialists — assign them to the same boss next season.
- Element matching — cross-reference the boss weakness shown in the boss tiles with the squads used here. Members not running the correct element should be coached.
- Your entry — highlighted with a ★ star next to your name so you can instantly spot your position.
- Damage column — total damage across all runs in the selected phase. Sorted highest to lowest.
- Run count — how many attempts each member has logged. Members with fewer runs may still have attempts remaining.
- Guild rank — use this to identify your top contributors and coordinate who should focus on which boss.
- Member filter — use the dropdown at the top of the drawer to switch between any guild member. Defaults to the highest damage dealer, but you can inspect anyone.
- Boss spread chips — shows which bosses the member attacked and how much damage they dealt to each, sorted by damage. Click a chip to jump to that boss.
- KPI row — attempts used (out of 3), total damage, guild damage share percentage, and final hit count at a glance.
- Squad cards — each of the member's runs displayed with the 5 Nikkes used, boss targeted, step level, and damage dealt.
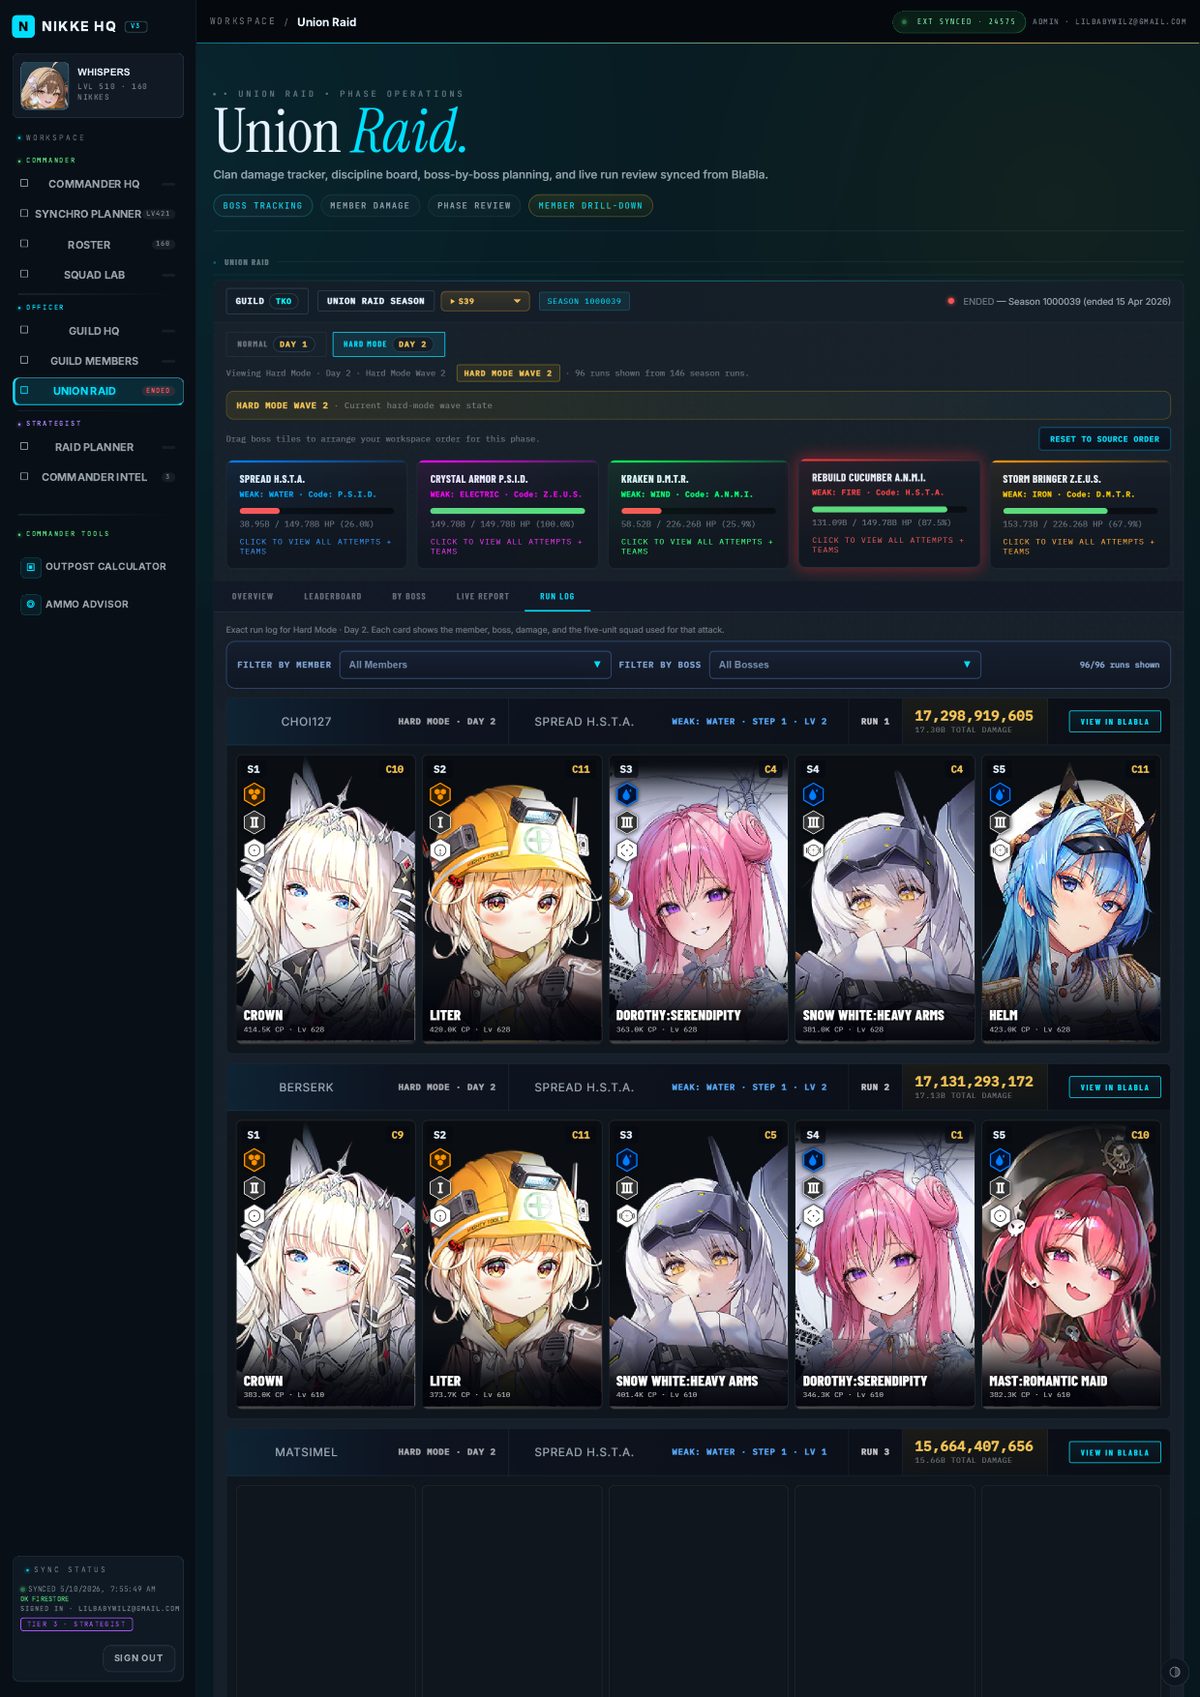
- Run header — shows the member name, phase, boss, weak element, step level and total damage dealt in that single run.
- Final Hit badge — runs marked FINAL HIT were the kill shot on a boss — these are often the highest-damage attempts.
- Squad portraits — the 5 Nikkes used in that run shown as portrait cards with element, burst and weapon icons. Hover to see their exact CP and level.
- View in Blabla — opens the original run in blablalink for full detail and replay.
- 📋 COPY IMAGE — captures the entire live report table as a high-resolution PNG and copies it straight to your clipboard. Open Discord, hit Ctrl+V (or Cmd+V), and the image is pasted — no file download needed.
- ▶ XLSX — exports the same data as an Excel spreadsheet for deeper analysis, archiving, or sharing in guild channels as a file.
- Normal / Hard toggle — the mode switch at the top of the live report bar lets you flip between Normal and Hard independently, so you can compare both without leaving the tab.
- Sort options — rank the table by Synchro level (default sheet order) or by total damage to quickly see top contributors.
- Member filter — use the dropdown to isolate a single member's row if you need to share one person's performance.
- Normal Mode — up to 10 levels per boss, all 5 bosses active. Each level has its own HP bar — clearing it advances to the next.
- Hard Mode — 4 levels, significantly higher HP. At Hard Level 4 only Boss 5 (Tyrant Class) spawns with ~6.98T HP that cannot be killed — pure damage race.
- Step + Level — each run header shows the step (difficulty tier) and level (wave position) of the attempt. Higher steps = harder = more damage expected.
- Lord vs Tyrant — Bosses 1, 2, 4 are Lord Class (lower HP). Bosses 3 and 5 are Tyrant Class (~2.26× more HP). Assign your best Tyrant teams to bosses 3 and 5.
- Step 1 — Extension sync — the NIKKE HQ Chrome extension pulls your guild's latest raid data from BlablaLink and saves it to the cloud. This only happens when you trigger it. Without a recent sync, the viewer shows stale data.
- Step 2 — Viewer refresh — this viewer reads from the cloud. The REFRESH button pulls the latest saved data. AUTO pulls it automatically every 30 seconds — but it can only show what the extension last synced.
- Auto-sync interval — in the extension popup, set an auto-sync interval (30s, 1 min, 5 min etc). This tells the extension to sync automatically on a schedule so the viewer stays live without manual effort.
- BlablaLink tab must stay open — the extension needs an active BlablaLink tab to sync. If you close BlablaLink, auto-sync stops silently until you reopen it.
- Sync before the raid starts — make sure everyone's data is up to date so the leaderboard and run log are accurate from attempt one.
- Check the weak element for each boss — it changes every season. Build your 5-man squads around the boss weakness, not just your strongest Nikkes in general.
- Review the By Boss tab — it shows which of your guild's members have the best damage on each individual boss. Use this to assign who attacks which target.
- Don't double-up on bosses unnecessarily — if a boss is nearly dead, co-ordinate which member lands the final hit rather than everyone piling in and wasting attempts.
- Hard Mode Level 4 is a full-guild effort — every member needs to use all their attempts on Boss 5. Track remaining attempts using the run log throughout the day.
- Use the Member Detail Drawer — select any member from the dropdown to review their squads, boss spread and attempt usage. Use this mid-raid to check who still has attempts left and what teams they ran.
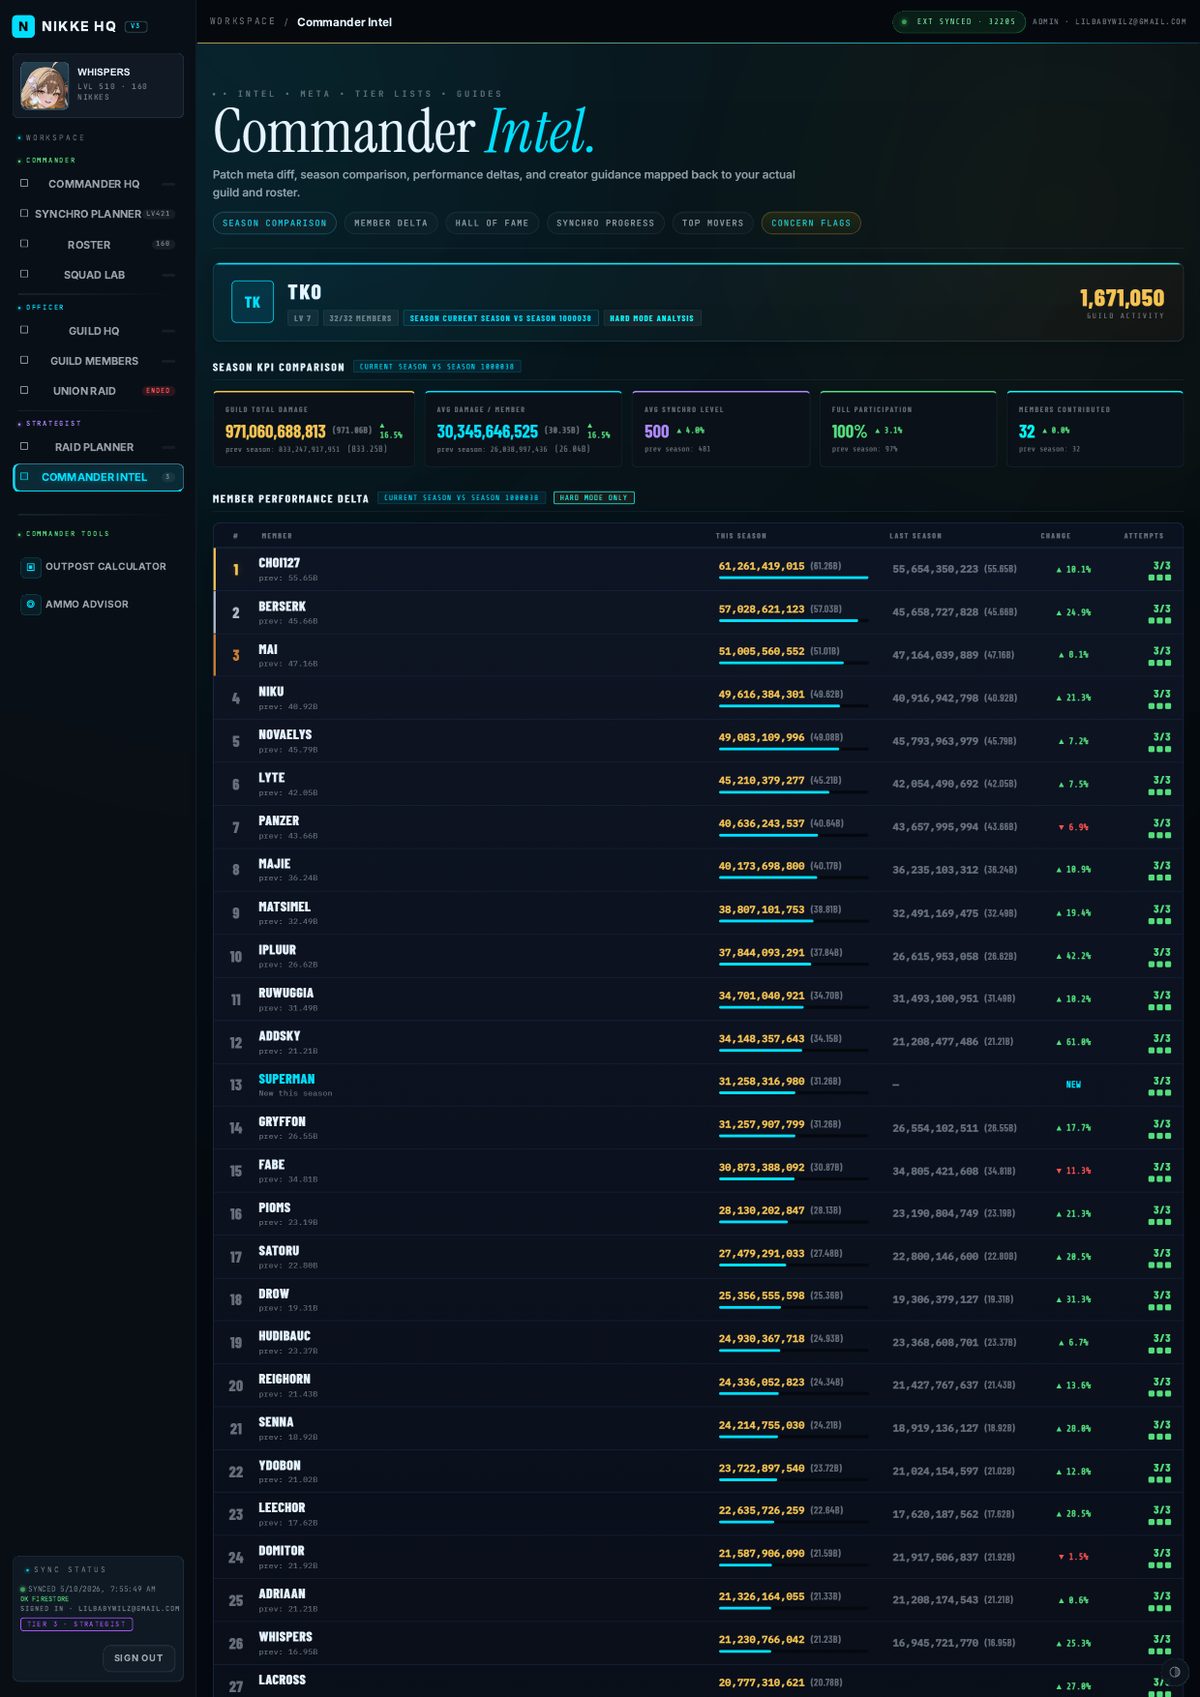
- Guild Total Damage — combined Hard Mode damage across all members this season vs last. Green ▲ means the guild is hitting harder overall.
- Avg Damage / Member — total damage divided by contributing members. A better measure of individual output than guild total, which can be skewed by roster size changes.
- Avg Synchro Level — the average synchro level across all members who participated in Hard Mode. Rising synchro = the guild is getting stronger.
- Full Participation — percentage of members who used all 3 Hard Mode attacks. Drop in this number is the first warning sign of engagement issues.
- Members Contributed — how many members logged at least one Hard Mode run. Fewer than last season may indicate roster changes or participation drops.
- This Season / Last Season — full damage numbers with short format in brackets for easy reading. Full number precision lets you spot even small differences.
- Change column — percentage improvement or decline. Green ▲ is growth, red ▼ is a drop. Use this to start performance conversations.
- NEW badge — member wasn't present in the previous season. Don't use last season as a baseline for them yet.
- ABSENT badge — member was in the previous season but hasn't contributed this season. Worth checking in with them.
- Attempts column — 3/3 means all Hard Mode attacks used. Partial or missing attempts alongside high damage often indicates the member is strong but disengaged.
- Qualification criteria — 3/3 attempts both seasons and damage recorded in both. New members and absent members are excluded.
- Ranked by current damage — not by improvement. This rewards members who consistently show up and deliver top damage.
- Change column — even consistent members can improve or decline. A consistent member with a big ▼ might need a squad review.
- Synchro level — derived from the highest unit level in each member's Hard Mode raid squad. Higher synchro generally means stronger units and more damage potential.
- Change column — exact point difference (e.g. ▲ 15 or ▼ 3). Rising synchro across the guild means members are actively upgrading their units.
- Flat synchro — members showing 0 change have not upgraded their units between seasons. May indicate they're hitting a wall or not investing in progression.
- Main number — the raw damage difference vs last season (e.g. +12.4B or -8.2B). This tells you exactly how much more or less they dealt, not their total.
- Arrow ▶ line — shows last season's damage → this season's damage for context, so you know whether a big gain came from a low or high base.
- % change — the percentage improvement or drop on the right. Useful for comparing across different damage tiers.
- Most Improved ▲ — members who grew their Hard Mode damage the most in raw terms. Rising stars worth recognising and investing in.
- Biggest Drop ▼ — members whose Hard Mode damage fell the most. Could indicate squad issues, changed boss assignments, or less practice.
- Excludes new and absent members — only members present in both seasons are shown for fair comparison.
- DMG ▼X% — member's Hard Mode damage dropped more than 20% vs last season. The exact percentage is shown so you can judge severity.
- FEWER ATTACKS — member used fewer Hard Mode attempts this season than last. Even if their damage is high, missing attacks hurts the guild.
- NO ATTACKS — member logged zero Hard Mode runs this season despite being present last season. Highest priority flag for officer follow-up.
- End-of-season review — paste the intel image into your officer channel after each season to start the debrief conversation with real data.
- Hall of Fame recognition — post the consistency section publicly to reward members who showed up every season.
- Concern follow-up — paste the flags section when messaging a member about their drop — it shows the exact numbers so the conversation is fact-based, not personal.
NIKKE HQ is an independent, fan-made companion tool built to support the player community. It is not affiliated with, endorsed by, or connected to Shift Up Corp., Level Infinite, or any of their subsidiaries.
All game content, character names, and assets referenced within this tool belong to their respective owners.
While we work hard to keep everything accurate, game data can change with updates — if you spot something off, let us know via Discord and we'll get it fixed.
© 2025–2026 Nabzsta Labs. All rights reserved.
You're welcome to use NIKKE HQ for personal purposes. The source code, design, and all intellectual property remain the exclusive property of Nabzsta Labs and may not be copied, modified, redistributed, or used to create derivative works without written permission.
Access to paid tiers is granted as a subscription license. Nabzsta Labs reserves the right to update, modify, or adjust features and access at any time.
NIKKE HQ respects your privacy and handles data responsibly.
- Google sign-in profile (email, display name, UID)
- In-game snapshot data (synced via Commander Sync extension)
- Viewer preferences (planner settings, LOA records, team configurations)
- Subscription tier and linked Sync Code
- Passwords or login credentials for any service
- Payment card details (handled entirely by Stripe)
- Browsing history, cookies, or tracking data
- Device identifiers or personal files
All data is stored securely in Google Firebase (Firestore) and is only accessible to you via authenticated sessions. We do not sell, share, or distribute your data to third parties.
For full details, see our Privacy Policy.